Natchez Datadog
This module provides a natchez EntryPoint that sends tracing information to Datadog.
Once you’ve got the EntryPoint you can then use Natchez as described in its README
Configuring the agent
Depending on how you’re using the Datadog agent you may need to set some configuration values to enable the APM. Details can be found on the Datadog website
By default natchez-extras-datadog currently expects the agent to be reachable over HTTP at http://localhost:8126.
You can choose a different URL by setting the agentHost parameter when constructing the EntryPoint.
Installation
natchez-extras-datadog uses HTTP4s to submit traces to the Datadog trace API, hence the need for http4s-blaze-client.
val http4sVersion = "0.23.23"
val natchezExtrasVersion = "8.1.0"

libraryDependencies ++= Seq(
  "org.http4s"    %% "http4s-blaze-client"           % http4sVersion,
  "com.ovoenergy" %% "natchez-extras-datadog-stable" % natchezExtrasVersion,
  "com.ovoenergy" %% "natchez-extras-slf4j"          % natchezExtrasVersion
)
Example usage
import cats.effect.{ExitCode, IO, IOApp, Resource}
import com.ovoenergy.natchez.extras.datadog.Datadog
import natchez.EntryPoint
import org.http4s.blaze.client.BlazeClientBuilder

import scala.concurrent.duration._

object MyTracedApp extends IOApp {

  /**
   * Create a Natchez entrypoint that will send traces to Datadog
   */
  val datadog: Resource[IO, EntryPoint[IO]] =
    for {
      httpClient <- BlazeClientBuilder[IO].withDefaultSslContext.resource
      entryPoint <- Datadog.entryPoint(httpClient, "example-service", "example-resource")
    } yield entryPoint

  /**
   * This app creates a root span, adds a tag to set the env to UAT
   * then creates a subspan that sleeps for two seconds
   */
  def run(args: List[String]): IO[ExitCode] =
    datadog.use { entryPoint: EntryPoint[IO] =>
      entryPoint.root("root-span").use { rootSpan =>
        for {
          _ <- rootSpan.put("env" -> "uat")
          _ <- rootSpan.span("child-span").use(_ => IO.sleep(2.seconds))
        } yield ExitCode.Success
      }
    }
}
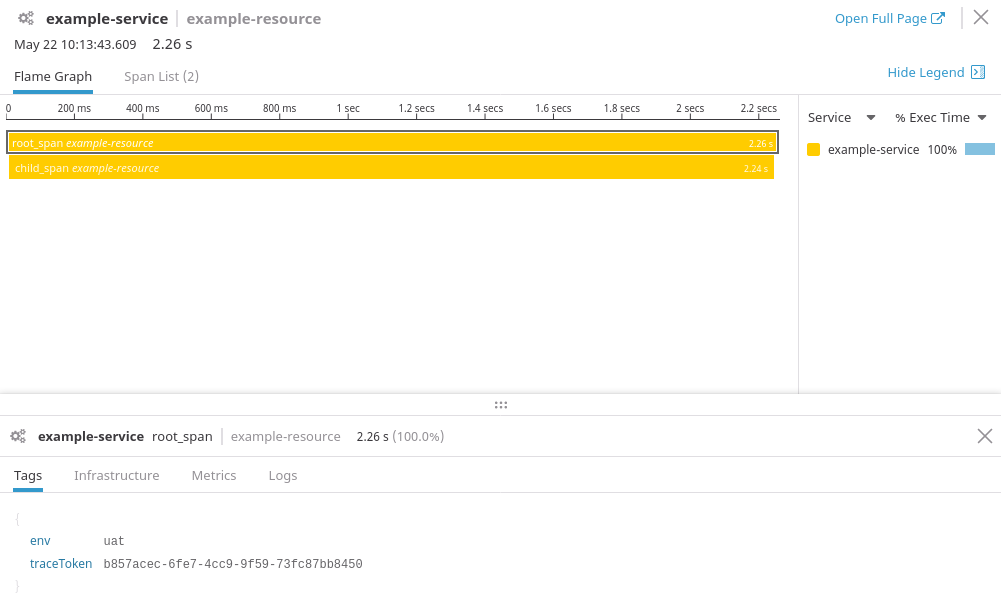
Running this should yield a trace in Datadog:
Naming spans and traces
Spans in Natchez are identified by a single name while in Datadog spans are identified by a service, resource, and name. You should ensure all your root spans have the same name so they’ll all show up in the Datadog UI.
You can set a default service & resource when creating the Datadog EntryPoint. If you want to change either value
for a particular span you can pass the new values into the span name as a colon separated string:
<service>:<resource>:<name>to set everything<resource>:<name>to keep the service of the parent span<name>to keep the service & resource of the parent span
Datadog specific tags
A number of helper functions to create tags that Datadog uses to drive its trace UI can be found in DatadogTags.scala.
An example of how to use them follows:
import com.ovoenergy.natchez.extras.datadog.DatadogTags._
import natchez.Trace

object DatadogTagsExample {

  def addTags[F[_]](implicit F: Trace[F]): F[Unit] =
    F.put(

      /**
       * This controls how the span is labelled in the Datadog trace UI
       * Valid values for this are "Web", "Cache", "Db" or "Custom" (the default)
       */
      spanType(SpanType.Web),

      /**
       * These appear in the trace UI alongside spans
       * 200 status codes appear green for example
       */
      httpStatusCode(200),
      httpMethod("GET"),
      httpUrl("http://localhost"),

      /**
       * I'm not actually sure where this appears in the UI
       * but I am given to believe that it does somewhere
       */
      sqlQuery("SELECT foo FROM bar"),

      /**
       * If your span fails these will be highlighted in red in the UI.
       * These tags will automatically be added to failed spans by natchez-datadog.
       */
      errorMessage("Something went wrong"),
      errorStack(new Exception().getStackTrace.mkString("\n"))
    )
}